Follow our journey in making our own Play dough. We got some pretty good results, and include our recipe and full illustrated instructions.
Sometimes Clare wishes we could buy Pasta, Pizza Bases, Stock, or Custard from the supermarket. She insists there is little economic reason for us to make our own, but the Chemist in me wins through and if it's possible to make our own then invariably I do. When I saw some generic play dough at the supermarket last weekend with 'aged 18 months plus' on the tub I decided to make up a home made batch instead.
It stems from my Childhood, I remember my Dad making me some 'Gunge' using cornflour, water, and green washing up liquid. He showed me how to sharpen a knife and how to make fire using wood and a bow. Amélie was too young for that, but Plasticine I could manage. My Mum was no different, we made our own Crisps (well we call them crisps in England, others call them chips), and my girlfriends were always amazed I could make my own ice cream and sew my own clothes.
Amélie will be 14 months old in a couple of weeks, perhaps a little young for play dough, and certainly too young to enjoy making a batch, but I thought I'd make up a test batch anyway. I remember the salt dough recipe, flour, water, and salt. Equal measures of flour and water (volume not weight) with half as much salt.
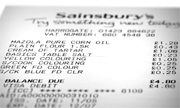
I added cream of tartar and a little vegetable oil to keep things moist and elastic. The picture is of the shopping list, I could have made up a bucket full from those provisions. The food colouring was 25 pence per bottle but I mistakenly picked up an expensive yellow for over a pound. It probably is cheaper to make your own but that's not why we did it. We would like Amélie to take part in making up the next batch, after all it's a fun way of teaching her chemistry.
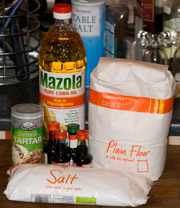
The basic recipe I used was 250ml of flour, 125ml of salt, a couple of teaspoons of cream of tartar, and 4 teaspoons of vegetable oil. I used corn oil, but I think rape seed oil especially canola would make the mixture more stable. To that I added 250ml of water. What I actually did was make up a batch of the dry ingredients, mix them up and halve them into 2 equal piles. Then I did 2 separate bowls using 1 pile in each bowl and 125ml of water in each bowl. This gave me 2 batches, I repeated this to get 4 batches of home made play dough.
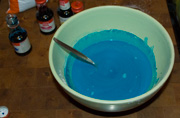
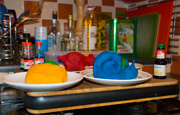
I did the following for all 4 batches. Firstly I mixed up all the ingredients and added some food colouring. I used quite a lot of food colouring, more than a few drops a good glug was used in each batch. I'd say I used about a fifth or sixth of a bottle on average. I used a couple of different bowls also, for the red I used a flat bottomed glass casserole dish. For the blue I used a bowl, the blue actually tuned out the best play dough but I'd recommend a flat bottomed dish as the whole process seems to go much quicker.
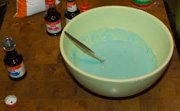
I could have got a pleasing teal or turquoise colour by using only a few drops of the blue food colouring. I could have got a pinker red or lighter green by using less of those colourings but I wanted some strong colours for my first batch. I took a picture of the teal mixture before I added more blue to get a deeper colour. I didn't go too dark though as I expected the colours to get deeper when the mixture was cooked.
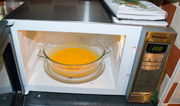
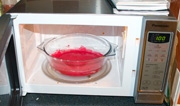
You could do this in a pan on a gas burner or electric hob. I didn't want to risk any of our pans so I opted to use the microwave. If you have ever done scrambled eggs in the microwave then it's a pretty similar process. In fact the yellow batch looked just like scrambled eggs during the cooking process. I'm going to describe the microwave process but you can just as well do it on the stove in a pan using a low heat.
The first batch (and the best) took ages to make. I did 30 seconds in the microwave on high, stirred for a minute and repeated. It took forever, perhaps 20 cycles using 30 second heating cycles in a bowl. The flat bottomed containers were much quicker than the bowls.
By the time I got to the yellow I was cooking for 2 minutes straight on high. Then stirring and repeating the process but doing 40 seconds instead of 2 minutes for the subsequent cycles. This only took about 5 cycles. I think the colour had an effect also. The same batch of mixture turned out a little differently depending on which food colouring I used.
t makes no difference if you are using the microwave or heating the mixture in a pan. You are looking for the mixture to thicken. First of all you get to a custard like constancy, there may be a few lumps but the mixture is still quite liquid and shiny. I used a teaspoon to stir the mixture which quickly produced blisters, a tablespoon or at least a desert spoon should save you from that.
After the custard stage the mixture holds together more and the shine becomes dull. As you stir the mixture begins to hold together into one lump and comes away from the side of the bowl. We are almost at the end of the process now, it will probably just need one more cycle and you are done. It should be pretty stiff and difficult to stir by now.
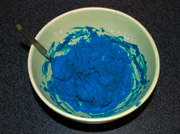
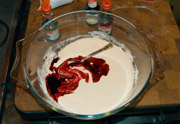
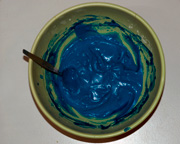
I hope you can see the difference in the first blue dough and the second. The first is too soon to stop, it's thickening well but still not dry or stiff enough. The second is almost done, perhaps one more 30 second blast in the microwave to make sure. It's collecting together into one mass and has come away from the side of the bowl. It's now time to leave it to cool.
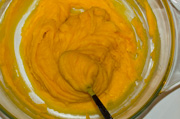
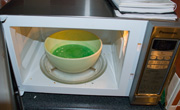
I've included a picture of the yellow dough at a similar stage. It probably also needs just another 30 second blast. Remember the dough will be hot and could burn your hands. If you are making this with your child I'd only let them do the processes where the ingredients are cold (the initial measuring and mixing, and final rolling out).
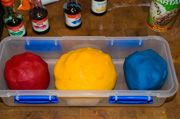
As soon as the dough is cool you can roll it up into a ball. It keeps best in Tupperware or in a sealed plastic bag. Experiment with the recipe, in one batch I accidentally missed out most of the salt and put in too little water. The play dough turned out just as good as the rest of the batches, so the recipe seems pretty resilient. The colour of the food dye and the shape of the bowl had more effect than the correct measurements.
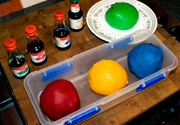
A week later and the home made play dough is still holding it's own. The blue batch is indistinguishable from regular plasticine. It smells different, but looks and feels just the same! The red is very good also, it's a little grainier and dryer than the blue. The yellow is much a little softer and less elastic and the green is a bit slimy. You can cook your loved one's home made play dough creations in the oven if you wish to immortalise them forever.
If you decide to have a go of this project let us know how you get on and send us some pictures!

© 2011-2024 Alex Aylesbury & Clare Jarvis, All rights reserved. Web Design Agency23